
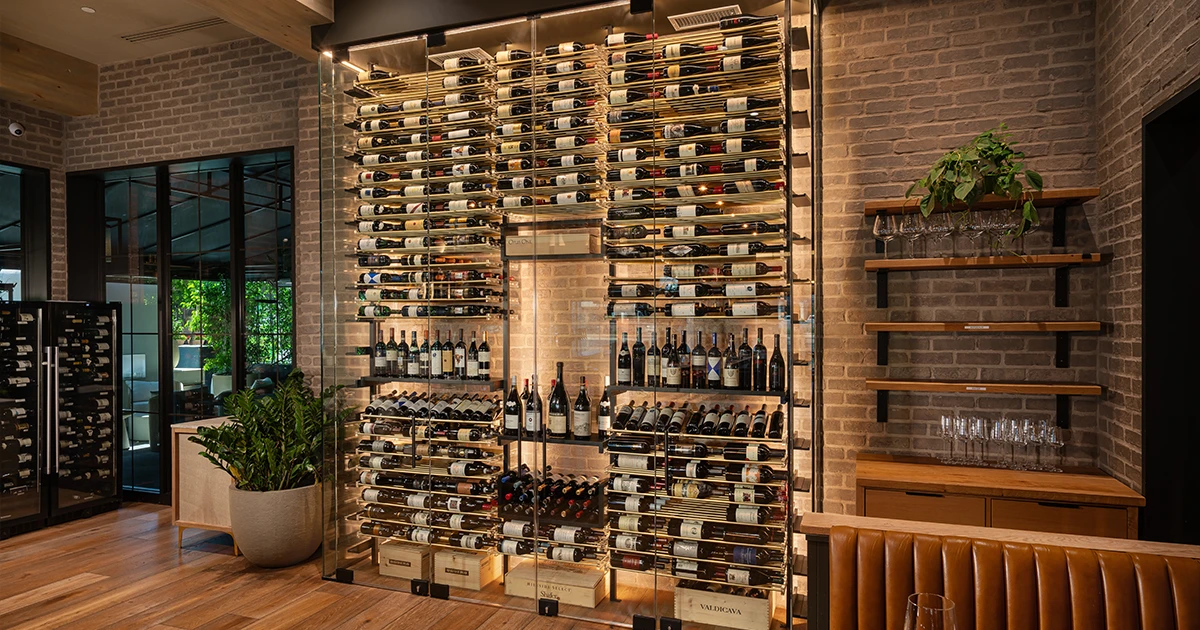

A bottle label can become part of the room’s visual rhythm
A wine label is a tiny poster. Many racks turn that story away. Modern displays treat each bottle as part of the room. Rows may float while labels face forward. The result feels light, even when full. That effect needs more than a product photo. Bottle count, strength, space, light, and reach still matter. A room enhanced with Millesime wine cellar racks may mix wood, metal, tall frames, or wall features. The collection includes linear racks, floating-bottle designs, U-shelves, counters, and vertical displays. This guide covers layout, balance, capacity, and installation. We cover labels, sizes, sightlines, materials, and growth. The benefit is a useful display that looks calm and keeps wine easy to reach from the very first glance to the final bottle selected for dinner.
Why treat space as part of storage? Open gaps help separate shapes, colors, and label rows. They also stop a full wall from feeling like one heavy block. A floating system can define an area without relying on solid wood cabinetry. Some configurations can stand away from a wall, while compact versions use wall space. Wood accents may warm the room, and metal lines can keep the look crisp. The choice should connect with floors, counters, lighting, and nearby furniture. It should also respect bottle weight and the structure carrying it. Professional guidance may be wise for tall frames, glass rooms, or uncertain mounting surfaces. The sections ahead turn the design idea into measurable decisions, clear viewing checks, and a safer installation plan.
What to decide before selecting a modern wine rack layout
Begin by choosing the view you want from the room’s main entrance. Decide whether labels or bottle ends should face forward. Count bottles by standard and large format before shopping. Mark the wall, floor, and ceiling limits on a scaled sketch. Note doors, glass panels, vents, lights, and walkways. Choose between a wall feature and freestanding frame. Set aside room for tasting or case storage. Keep future bottle growth clearly included in the capacity plan.
- Total bottles and expected collection growth
- Label-forward, cork-forward, or mixed presentation
- Wall-mounted or floor-to-ceiling support needs
- Wood accents, metal finish, and nearby materials
Next, sketch the rack from more than one viewpoint. Check how it appears from the room entrance. Make sure chairs and doors can move freely. Keep lower bottles away from common impact areas. Place favorite labels near natural eye level. Avoid filling every open space merely because it exists. A clear design uses capacity without losing visual calm.
How to test the display from every important viewpoint
Tape the planned outline at full scale before buying the rack. Mark bottle rows at their true heights with removable painter’s tape. Walk through the room by day and evening from common paths. Use these four viewpoints to refine the design before approving the layout.
- View the rack when entering the room
Pause where a guest first sees the collection and look straight ahead. Check whether the display has one clear focal area rather than several weak ones. Shift crowded sections away from the strongest sightline until spacing feels calm.
- Study it from the tasting area
Look across the rack from seated and standing height during a normal tasting. Keep useful bottles within a comfortable reach. Leave enough room for glasses, tools, and serving.
- Follow the main walking path
Move past the proposed rack at normal speed. Watch for sharp corners and narrow clearances. Protect lower bottles from bags, chairs, and passing feet.
- Review the display under room lighting
Check glare, shadows, and heat near every row. Aim light at the display, not directly into labels. Keep fixtures and wiring clear of bottle access.
Why installation planning protects bottles and visual balance
Modern racks can carry heavy loads. Confirm support before ordering each section. Identify wall material, studs, joists, and ceiling structure. Use hardware approved for the rack and surface. Do not guess about anchors behind finished walls. Check local rules for tall or commercial installations. Ask a qualified installer when structural details are unclear. Keep bottles away until the system is secure. Test stability before loading one row at a time.
- Follow the current plans and installation instructions.
- Level every frame before joining nearby sections.
- Keep fasteners accessible for later inspection.
- Record hidden supports before closing finished surfaces.
Load bottles evenly instead of filling one side first. Watch each connection as weight is added. Leave access for cleaning around frames and shelves. Check that bottle supports do not scrape labels. Review the system after the first full week. Tighten or adjust parts only as the maker directs. Careful setup lets the clean design remain the main focus.
Give every bottle a place in the room’s larger story
A modern wine display succeeds when beauty and use agree. We can start with bottle counts, real dimensions, and honest growth plans before one bottle moves. We can test each sightline from several angles before metal, wood, or glass fixes the layout. Strong support and approved hardware protect the collection behind the style. Clear paths make the room easier to enjoy. Thoughtful spacing gives special labels room to speak. Begin by marking one wall, frame, or feature at full scale today. Study it during the day and after the lights come on. If the view still feels right, move forward with the correct plan and installation help. Your collection can then become part of the room without losing its purpose.

Comments are closed.